github速度慢,所以用油猴插件来下载,下载注意根据自己平台来选择,比如我玩客云刷的armbain,所以选择arm的32位
下载之后用winscp上传到armbian
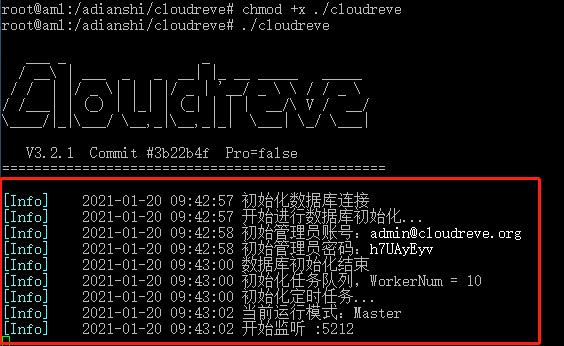
# 赋予执行权限 chmod +x ./cloudreve
# 启动 Cloudreve ./cloudreve
记录初始账号密码,
这样启动后,你就能通过 http://服务器IP:端口 来访问你的 Cloudreve 网盘了。默认的端口号为 5212
在/lib/systemd/system目录下创建一个服务
touch /lib/systemd/system/cloudreve.service
通过vi打开服务配置:
vi /lib/systemd/system/cloudreve.service
ctrl+c复制下面shift+insert粘贴
[Unit]
Description=Cloudreve
Documentation=https://docs.cloudreve.org
After=network.target
Wants=network.target
[Service]
Type=simple
# cloudreve 文件的存放路径,跟上面的一样,请根据自己的情况设置,默认储存策略的文件会储存在其中
WorkingDirectory=/adianshi/cloudreve
ExecStart=/adianshi/cloudreve/cloudreve
Restart=on-abnormal
RestartSec=5s
KillMode=mixed
StandardOutput=null
StandardError=syslog
[Install]
WantedBy=multi-user.target
更新重启服务
# 更新配置
systemctl daemon-reload
# 启动服务
systemctl start cloudreve
# 设置开机启动
systemctl enable cloudreve
# 启动服务
systemctl start cloudreve
# 停止服务
systemctl stop cloudreve
# 重启服务
systemctl restart cloudreve
# 查看状态
systemctl status cloudreve
